Firmware
The Chronos RC cars run a custom firmware that interfaces with CRS. The firmware controls the actuators of the car, samples the sensors and communicates with CRS over Wi-Fi.
The firmware folder contains the firmware for the Chronos cars. It is written in C++ and based on the ESP-IDF framework for the ESP32 microcontroller.
Additional firmware runs on the auxiliary STM32 microcontroller on the PCB. The firmware is written in C and is based on the STM32Cube framework. The firmware source code can be found in the stm32 firmware folder.
Firmware compatibility
| PCB revision | ESP32 firmware | STM32 firmware (commit hash) |
|---|---|---|
| v0.0P3 | >= v1.0 | <= aec36c2d |
| v2.0 | >= v4.4 | >= 4aadaafb |
Firmware flashing
Obtaining the firmware
The firmware folders detail how to build the firmware. Also, pre-built binaries are available for some releases in the same folders.
Note: Make sure to match the build with the PCB revision.
Flashing the firmware
Usually, the firmware of the car does not need to be flashed. However, in case new features or bug fixes are available, the firmware can be updated.
-
Insert batteries into the car and turn it on.
- Grab the newest firmware — or the files you were given as a one-off binary. You need
bootloader.bin,partition-table.binandcar-firmware.bin. - Install the
esptoolpackage (in a virtual environment, if desired).
- Connect the ESP-PROG board to your computer using a USB to Micro-USB cable. Make sure to configure the jumpers on the ESP-PROG as indicated below.
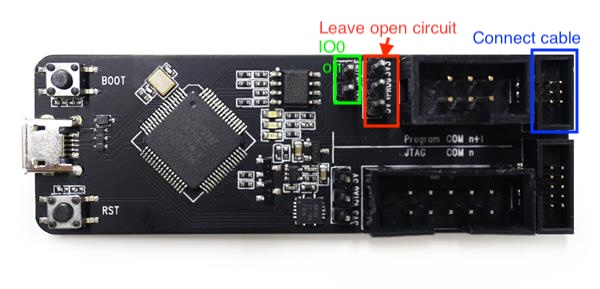
- Connect the ESP-PROG board to the PCB using the small PROG ribbon cable. Make sure not to reverse the connector on old PCBs that are not keyed! There, a small dot indicates the point where the notch of the ribbon cable goes.
- Open a terminal on your computer and navigate to the location of the three binaries.
- Find out which serial port was opened from the PROG board (
ls /dev/tty*,ls /dev/cu*, ...). The PROG port is usually on theN + 1port (i.e., if there aretty.usbserial300andtty.usbserial301, it'stty.usbserial301). - Run the following command, replacing
(PORT)with the port you found in the previous step.
- Grab the newest firmware — or the files you were given as a one-off binary. You need
python3 -m esptool -p (PORT) -b 460800 --before default_reset --after hard_reset --chip esp32 write_flash --flash_mode dio --flash_size detect --flash_freq 40m 0x1000 bootloader.bin 0x8000 partition-table.bin 0x10000 car-firmware.bin
9. Wait for the flashing process to complete.
- Use the steer trimming feature if needed, the previously stored configuration might have been overwritten and reset to default.
Which firmware version do I have?
The firmware version of the ESP32 can be found in the configuration interface under the section Software Configuration.